Have you ever faced a malfunctioning garage door that wouldn’t open or close properly? Regular maintenance of your garage door is crucial for ensuring its smooth operation and your safety. Among the most critical components requiring attention are the garage door springs. Understanding the process of replacing a garage door spring is key, not only to extend the lifespan of your door but also to safeguard against potential accidents.
Replacing a garage door spring involves significant risks, including potential injury from the high tension in the springs. Therefore, it’s vital to approach this task with the right knowledge and tools. In this guide, we’ll walk you through the essential steps and safety precautions to help you handle the replacement process confidently and securely. Whether you’re a seasoned DIY enthusiast or a first-timer, gaining insight into this task can save you time and help avoid costly mistakes.
Understanding Garage Door Springs
Garage doors are an essential part of many homes, providing security and convenience. However, they require regular maintenance to function properly, especially when it comes to their springs. Understanding the types of springs and their roles can help you maintain your garage door more effectively.
Types of Garage Door Springs
There are two primary types of garage door springs: torsion springs and extension springs. Here’s what you need to know about each type:
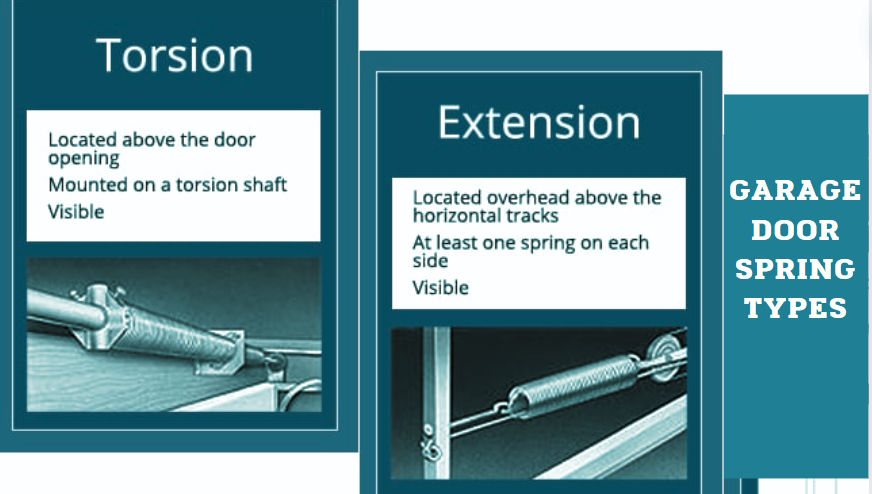
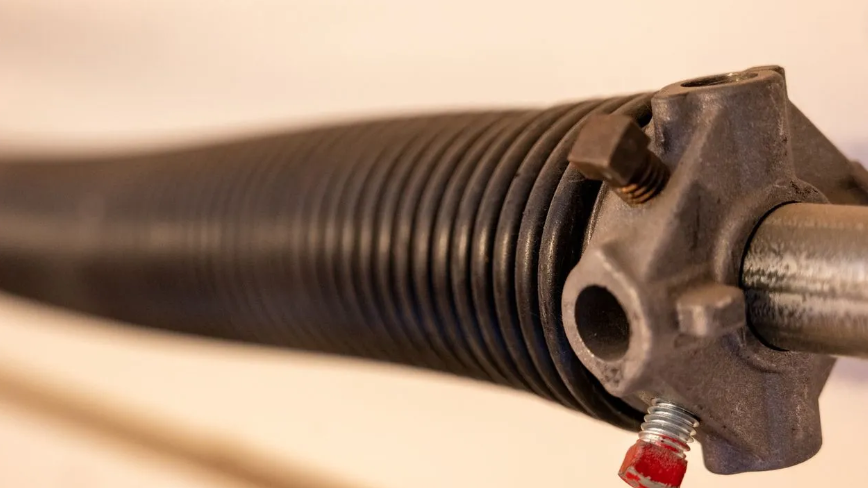
- Torsion Springs: These springs are mounted on a stationary metal shaft located above the garage door opening. Torsion springs are known for their efficiency and durability. They use torque to lift the door, which involves the spring turning or twisting to exert force. This type of spring is particularly suited for heavier garage doors.
- Extension Springs: Extension springs are typically located above the upper horizontal tracks on both sides of the garage door. As their name suggests, they extend when the door is moved, helping to counterbalance the weight of the door as it opens and closes. They are more common in lighter or older garage door designs.
Importance of Knowing Your Garage Door Spring Type
Identifying which type of spring your garage door uses is crucial for several reasons:
- Safety: Both types of springs are under significant tension and can be dangerous if they fail or are mishandled. Knowing the type of spring you have can help you understand the specific risks and safety precautions necessary during maintenance or repair.
- Maintenance Requirements: Torsion and extension springs have different maintenance needs. For example, torsion springs often require less frequent maintenance than extension springs, but both types require regular inspections and adjustments to ensure safe and effective operation.
- Repairs and Replacements: When it comes to repairs, especially if you’re considering how to replace a garage door spring, knowing the type of spring you have is essential. Replacement procedures for torsion and extension springs differ significantly in terms of complexity and safety precautions.
Understanding these components will help you maintain the longevity and safety of your garage door, ensuring it continues to function efficiently for years to come.
Signs That You Need to Replace Your Garage Door Spring
Garage door springs are crucial for the smooth and safe operation of your garage door. However, like all mechanical components, they wear out over time and require replacement. Recognizing the signs of a failing garage door spring is essential to prevent further damage and ensure safety. Here are some common indicators that your garage door spring may need to be replaced:
Common Indicators of a Failing Garage Door Spring
- Uneven Lifting: If you notice that your garage door is lifting unevenly, with one side higher than the other, it could be a sign that one of the springs is failing and unable to bear the weight properly.
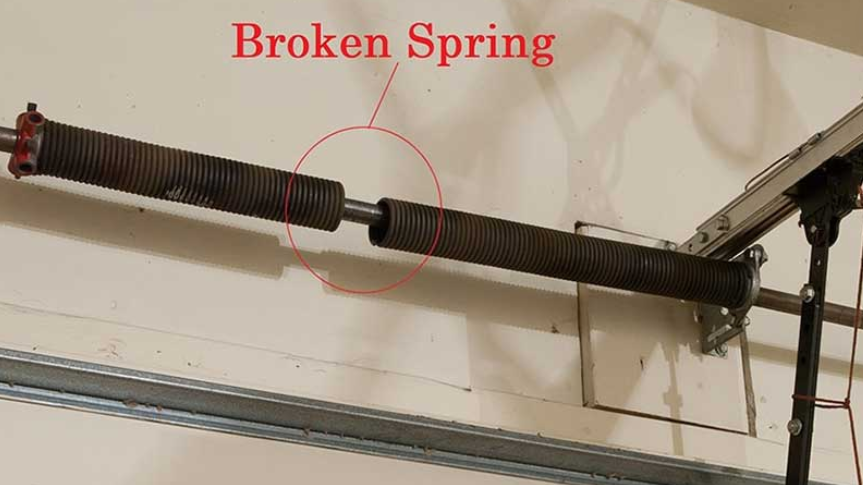
- Loud Noises: Squeaking or groaning noises when you open or close your garage door can indicate that the springs are under excess stress or starting to wear out. A loud snap or bang can signify that a spring has already broken.
- Garage Door Won’t Open: If your garage door won’t open, or opens only a few inches and then stops, this is a strong indication that a spring has broken. The door is too heavy for the opener to lift without the assistance of the spring.
- Visible Wear or Damage: Check the springs for any visible signs of wear or damage, such as gaps between the coils, rust, or the springs appearing stretched out. These are all signs that the springs are nearing the end of their lifespan.
Potential Risks of Ignoring These Signs
Ignoring the signs of a failing garage door spring can lead to several risks:
- Safety Hazards: A broken spring can cause the garage door to fall unexpectedly, which is a significant safety hazard to you and your family, especially if the door fails while being manually operated.
- Further Damage to the Garage Door System: Continuing to operate a garage door with a faulty spring can cause additional wear and stress on other parts of the door system, such as the garage door opener and the tracks, potentially leading to more extensive and expensive repairs.
- Inconvenience: A non-functional garage door can significantly disrupt your daily routine, particularly if your vehicle is stuck inside the garage.
To avoid these risks, it’s important to address any issues with your garage door springs promptly. If you’re experienced in home repairs and have the necessary tools, you might consider learning how to replace a garage door spring yourself. However, due to the dangerous nature of the task, it’s often recommended to hire a professional to ensure the job is done safely and correctly.
Necessary Tools and Safety Equipment for Replacing a Garage Door Spring
Replacing a garage door spring can be a risky task if not done with the proper tools and safety precautions. Ensuring you have the right equipment before starting this job is crucial to both the success of the project and your personal safety. Here is a detailed list of the necessary tools and safety equipment required for replacing a garage door spring.
Tools Needed for the Job
- Winding Bars: These are absolutely essential for adjusting the tension on the torsion springs. Ensure that you have the correct size of winding bars for your specific garage door mechanism.
- Socket Set: A comprehensive socket set is necessary for loosening and tightening the nuts and bolts that hold the garage door and the spring assembly in place.
- Adjustable Wrench: This tool will help with various adjustments and can be used where a socket doesn’t fit.
- Cordless Drill: A drill might be required to remove screws that hold the spring and cable brackets to the garage frame.
- Vise Grips: These are crucial for holding the garage door in place while you work on the springs. They can prevent the door from dropping unexpectedly.
- Tape Measure and Level: Precision is key in ensuring that the door is balanced and properly aligned after you replace the springs.
- Replacement Springs: Make sure you have the correct replacement springs for your garage door, as using the wrong type can lead to further damage and can be extremely dangerous.
Essential Safety Equipment
- Safety Glasses: Always wear safety glasses to protect your eyes from possible flying debris or if a spring breaks during installation.
- Gloves: Thick gloves can protect your hands from sharp edges of the garage door parts and from the tension of the springs during adjustment.
- Sturdy Ladder: A solid and stable ladder is necessary to reach the springs located above the door. Ensure it is properly balanced and sits securely on the floor.
- Hard Hat: Considering the potential for heavy components to move unexpectedly, wearing a hard hat can provide additional protection from serious injury.
- Comfortable Clothing: Wear clothing that does not restrict movement but is also not too loose, as baggy clothes can get caught in the moving parts of the garage door mechanism.
When considering how to replace a garage door spring, being equipped with the right tools and safety gear is just as important as understanding the process itself. This not only ensures that the job is done correctly but also safeguards against possible injuries. If you’re not confident in your ability to safely replace the spring, it may be wise to call a professional.
Step-by-Step Guide to Replacing Your Garage Door Spring
Replacing a garage door spring is a critical task that requires attention to detail and strict adherence to safety protocols to prevent injuries and ensure a properly functioning door. This guide provides step-by-step instructions on how to safely remove the old spring and install a new one, highlighting areas where extra caution is needed.
Preparation
- Ensure Safety and Gather Tools: Before beginning, make sure you have all the necessary tools and safety equipment at hand. Disconnect the power to your garage door opener to prevent any accidental activation.
- Secure the Door: Secure the garage door by locking pliers or a C-clamp on the track on both sides of the door just below the lowest roller. This prevents the door from popping open under spring tension.
Removing the Old Spring
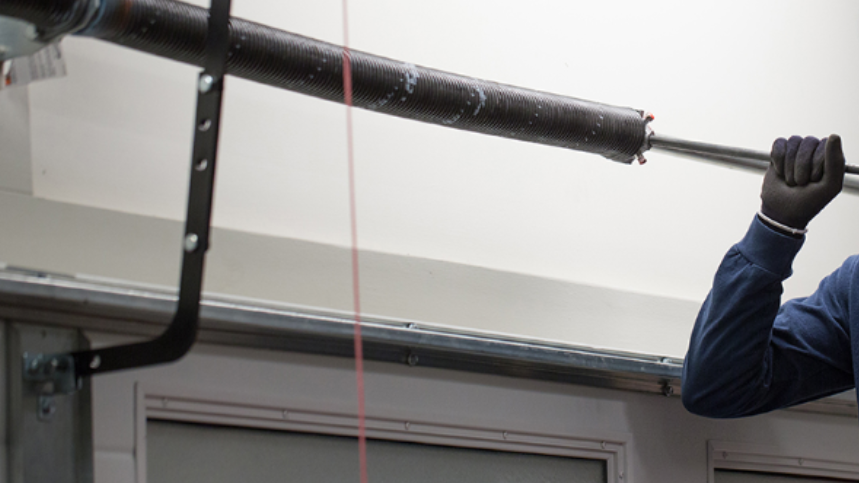
- Release Tension: If you’re dealing with a torsion spring, insert winding bars into the winding cone holes, ensuring they are fully seated and held securely. Carefully and slowly unwind the spring.
Caution: This is a high-risk step as the springs are under tension. Keep your head and body to the side of the winding bars to avoid injury should the bars slip.
- Disconnect the Spring: Once the tension is fully released, you can proceed to disconnect the springs from the brackets, cables, and pulleys.
Installing the New Spring
- Install the New Spring: Position the new spring by following the reverse process of removal. Secure the spring at the center first, then attach cables and pulleys as applicable. For torsion springs, make sure the spring is centered before tightening the screws.
- Apply Tension: With the torsion spring, apply tension using the winding bars. Perform quarter-turn increments; a typical 7-foot door usually requires 30 quarter-turns.
Caution: Be cautious of over-tightening, as it can damage the spring.
- Secure and Test the Assembly: Tighten all set screws and bolts to ensure everything is snug. Remove the locking pliers or C-clamps and slowly test the movement of the door by manually lifting it. It should move smoothly and stay in place when left halfway open. Adjust the spring tension if necessary.
Final Safety Checks and Testing
- Reconnect Opener and Test Operation: Reconnect the garage door opener and test the door operation with the opener to ensure it functions correctly. Watch for smooth operation and listen for any unusual sounds.
- Inspect the Installation: Double-check all the connections, screws, and spring alignment. Confirm that no part is overly stressed or misaligned.
Important Safety Reminders: Always wear safety glasses and gloves during this process. If at any point the task feels beyond your capability, or if you observe any complex issues, do not hesitate to call a professional. Working with garage door springs can be dangerous due to the high tension involved. It’s crucial to approach how to replace a garage door spring with respect for the inherent risks.
By following these steps and maintaining a focus on safety, you can successfully replace your garage door spring, ensuring your door operates safely and efficiently.
Testing Your Installation
After replacing a garage door spring, it’s critical to test the installation to ensure everything is functioning correctly. Proper testing can prevent future problems and ensure that the door operates safely and efficiently. This section will guide you through how to test the garage door balance address adjustments, and troubleshoot common issues after installation.
How to Test the Garage Door Balance
- Manual Testing:
- Disconnect the garage door opener to allow manual operation.
- Lift the garage door manually from the closed position to about halfway up and let go. The door should stay in place, supported by the springs.
- If the door slides down or shoots up, it indicates that the springs are either too loose or too tight.
- Visual Inspection:
- Check for smooth operation as the door moves up and down.
- Observe the springs during movement to ensure they are functioning without any irregularities or excessive strain.
- Adjusting Spring Tension:
- If the door does not remain open halfway, additional tension may be needed on the springs. Conversely, if it’s hard to pull down, the tension may be too high.
- For torsion springs, use the winding bars to adjust tension. Apply quarter turns to increase or decrease tension as needed.
- Safety Note: Always insert the winding bars fully and keep your head and body away from the path of the bars to avoid injury if they slip.
Adjustments and Troubleshooting Common Issues
- Adjusting for Smooth Operation:
- If the door opens unevenly, it may require adjustments to the spring tension on one side. This is common with torsion springs, where each side can be adjusted independently.
- For extension springs, ensure both sides are equally tensioned and that any obstructions or damage does not hinder the pulley system.
- Addressing Noisy Operation:
- Lubricate all moving parts, including springs, rollers, and hinges. This can reduce noise and improve operation smoothness.
- Check for loose hardware and tighten any bolts and screws that have come loose.
- Troubleshooting Door Closure Issues:
- If the door closes too quickly or slams shut, reduce the spring tension slightly.
- Conversely, if the door is difficult to close, slightly increase the spring tension.
- Safety Check:
- After making any adjustments, perform the balance test again to ensure the door is properly balanced.
- Reconnect the garage door opener and observe the door’s operation with the automatic mechanism to ensure everything aligns and functions without straining the opener.
Testing and adjusting your garage door after installing new springs is vital for safety and longevity of the door mechanism. Remember, if you encounter problems during testing or are uncertain how to properly make adjustments, it’s advisable to consult with or hire a professional. Proper installation and maintenance following the guide on how to replace garage door spring can ensure that your garage door remains a reliable asset to your home.
FAQ About How to Replace Garage Door Spring
Can I replace the garage door spring myself?
Replacing a garage door spring by yourself is possible if you have a clear understanding of the mechanism, the right tools, and a strong commitment to safety. Given the complexity and the risks involved, particularly with the tension in the springs, it is generally recommended to seek professional help unless you are experienced in this type of task. For those who are well-versed in home repairs and confident in their ability to follow safety protocols, there are plenty of resources and guides, including detailed instructions on how to replace garage door springs.
How much does it cost to replace coil springs on a garage door?
The cost of replacing coil springs on a garage door varies widely, depending on several factors such as the type of springs (torsion or extension), the local labor rates, and whether the job is straightforward or complicated by other repair issues. On average, homeowners can expect to pay between $150 to $350 for professional replacement of garage door springs. This range includes both parts and labor.
How long does it take to replace garage door springs?
The duration required to replace garage door springs can vary. For a professional technician, the job typically takes between 30 minutes to 2 hours. This timeframe can be extended if the setup is unusually complex or if additional garage door issues need to be addressed. For DIYers, the process might take longer due to the learning curve and the need for meticulous attention to safety.
Is it safe to replace garage door springs?
Safety is a significant concern when replacing garage door springs due to the high tension involved in the operation. The springs are under considerable pressure, and improper handling can lead to serious injuries. It is safe when performed by professionals who have the proper training, experience, and tools. If you choose to undertake this task yourself, it is crucial to follow all safety guidelines and use the correct tools meticulously.
What is the life of a garage door spring?
The lifespan of a garage door spring generally ranges from 7 to 12 years, depending on the quality of the spring and the frequency of door usage. This typically translates to approximately 10,000 to 20,000 cycles, with one cycle being a single opening and closing of the door. Regular maintenance, including lubrication and checking for wear and tear, can help extend the life of the springs.
Conclusion
Replacing garage door springs is a crucial maintenance task that ensures smooth operation and safeguards your household’s safety. The process involves significant risks, making it essential to approach the task with thorough preparation, precise execution, and stringent safety measures. While DIY methods can be effective for those with the right tools and experience, the complexities and dangers associated with how to replace garage door springs often necessitate professional intervention.
When the task exceeds your comfort level or if you encounter issues beyond basic adjustments, it’s prudent to call in experts. This is where Garage Door Springs Specialists come into play. Recognized for their commitment to quality and safety, Garage Door Springs Specialists provide a reliable solution for all garage door needs, focusing on spring replacement.
We encourage anyone facing issues with their garage door springs or those who simply want to ensure their system is in top condition to contact Garage Door Springs Specialists. With their expertise, you can expect efficient, safe, and professional service that will extend the lifespan and functionality of your garage door. Trust the professionals at Garage Door Springs Specialists to ensure your garage door operates smoothly and securely.
End Note
Since 2009, Garage Door Springs Specialists have been your trusted source for top-quality garage door services, with a special focus on garage door springs. Our dedicated team provides the best service to homeowners and businesses in the community. Our goal is to keep your garage door safe and functional for years to come.
Our blog offers valuable maintenance tips to help you keep your garage door in top condition. From simple DIY tasks to more detailed guides, our blog is designed to provide you with the knowledge you need to maintain your garage door effectively. Additionally, follow us on Facebook to stay updated with the latest tips, expert advice, and special offers.
Join the numerous satisfied customers who trust Garage Door Springs Specialists. Visit our Contact page today to schedule your service. With us, your garage door safety and efficiency are our top priorities. Take the first step towards a secure and hassle-free garage by choosing Garage Door Springs Specialists—where your satisfaction is guaranteed.


